Web前端:Todo List应用
本课程网站内容请仔细阅读后再进行实操。因未仔细阅读内容,出现任何错误后果自负(逃~~~逃~~~逃
所有的代码请不要复制粘贴,请手敲每一行代码。复制粘贴不会让你动脑子,而手敲每一个行代码会让你自然而然地去动脑子会想每一行代码的含义和原理
我们先来设计最基础的功能,Todo List 一般用来记录备忘的,最简单的功能包括:
- 新增一条备忘。
- 修改该条备忘。
- 选择/全选删除某条备忘。
- 将某条备忘设置成已完成。
- 快速删除已完成的备忘。
完成基础UI部分
- 新建
src/views/文件夹; - 新建
src/components/icons文件夹;
请用 VS Code 新建 src/components/icons/XMark.vue 文件,输入如下代码:
<script setup></script>
<template>
  <svg xmlns="http://www.w3.org/2000/svg" width="18" height="18">
    <path
      fill="#494C6B"
      fillRule="evenodd"
      d="M16.97 0l.708.707L9.546 8.84l8.132 8.132-.707.707-8.132-8.132-8.132 8.132L0 16.97l8.132-8.132L0 .707.707 0 8.84 8.132 16.971 0z"
    />
  </svg>
</template>
<style></style>
关于ICON的SVC代码,你可以重这个网站找到:https://heroicons.com/
请用 VS Code 新建 src/components/Header.vue 文件,输入如下代码:
<script setup></script>
<template>
  <header class="container mx-auto px-6 pt-11 md:max-w-xl">
    <div class="flex justify-between">
      <h1 class="text-2xl font-bold tracking-wide">Todo Application</h1>
    </div>
  </header>
</template>

<style></style>
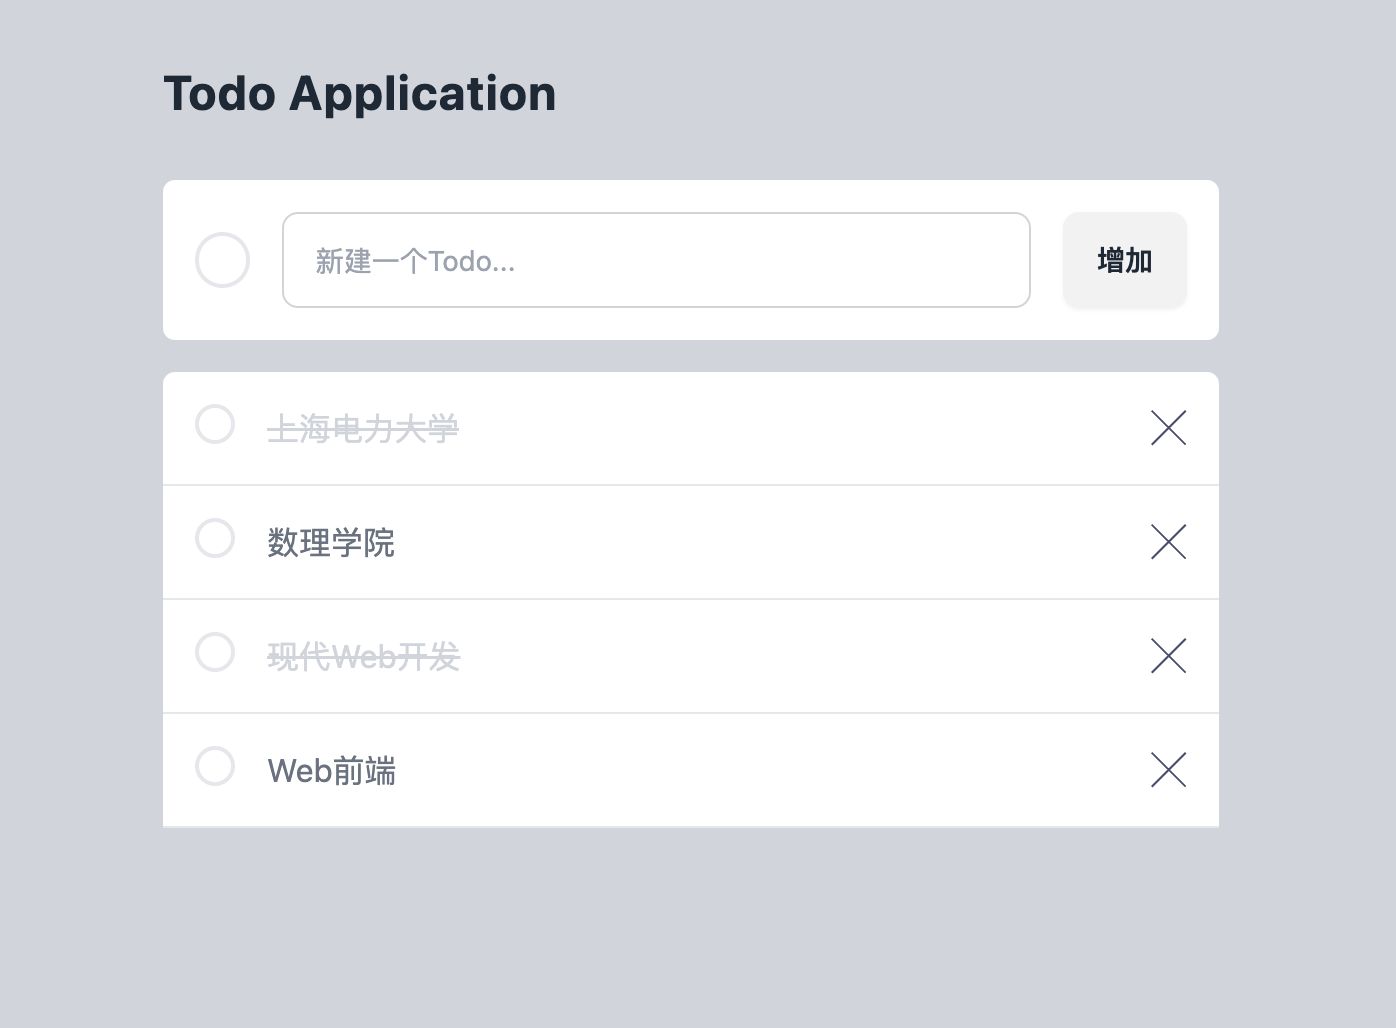
请用 VS Code 新建 src/components/TodoCreate.vue 文件,输入如下代码:
<script setup></script>
<template>
  <form
    class="mt-7 flex items-center gap-4 overflow-hidden rounded-md bg-white p-4 transition-all duration-700"
  >
    <span
      class="inline-block h-7 w-7 rounded-full border-2 transition-all duration-700"
    ></span>

    <input
      type="text"
      placeholder="新建一个Todo..."
      class="input input-bordered input-md w-96"
    />
    <button class="btn">增加</button>
  </form>
</template>
<style></style>
此处的input 和 button 使用了 daisyUI 组件库,相关文档可见如下链接:
input: daisyUI Input 组件button: daisyUI Button 组件
请用 VS Code 新建 src/components/TodoList.vue 文件,输入如下代码:
<script setup>
import XMark from "./icons/XMark.vue";
</script>
<template>
  <div class="mt-4 rounded-t-md bg-white transition-all duration-75">
    <article class="flex gap-4 border-b border-gray-200 p-4">
      <button
        class="h-5 w-5 rounded-full border-2 transition-all duration-700"
      ></button>
      <p class="flex-auto text-gray-500 transition-all duration-700">
        上海电力大学
      </p>
      <button>
        <XMark />
      </button>
    </article>
  </div>
</template>

<style></style>
请用 VS Code 新建 src/views/TodoView.vue 文件,输入如下代码:
<script setup>
import Header from "../components/Header.vue";
import TodoCreate from "../components/TodoCreate.vue";
import TodoList from "../components/TodoList.vue";
</script>

<template>
  <div class="min-h-screen bg-gray-300">
    <Header />
    <main class="container mx-auto px-6 md:max-w-xl">
      <TodoCreate />
      <TodoList />
    </main>
  </div>
</template>

<style></style>
请用 VS Code 修改 src/App.vue 文件,代码如下:
<script setup>
import TodoView from "./views/TodoView.vue";
</script>

<template>
  <TodoView />
</template>

<style scoped></style>
上述修改后有如下目录树:
src/
├── App.vue
├── assets
│   └── vue.svg
├── components
│   ├── Header.vue
│   ├── TodoCreate.vue
│   ├── TodoList.vue
│   └── icons
│       └── XMark.vue
├── main.js
├── style.css
└── views
    └── TodoView.vue
浏览器显示效果如下所示:
列出Todo List
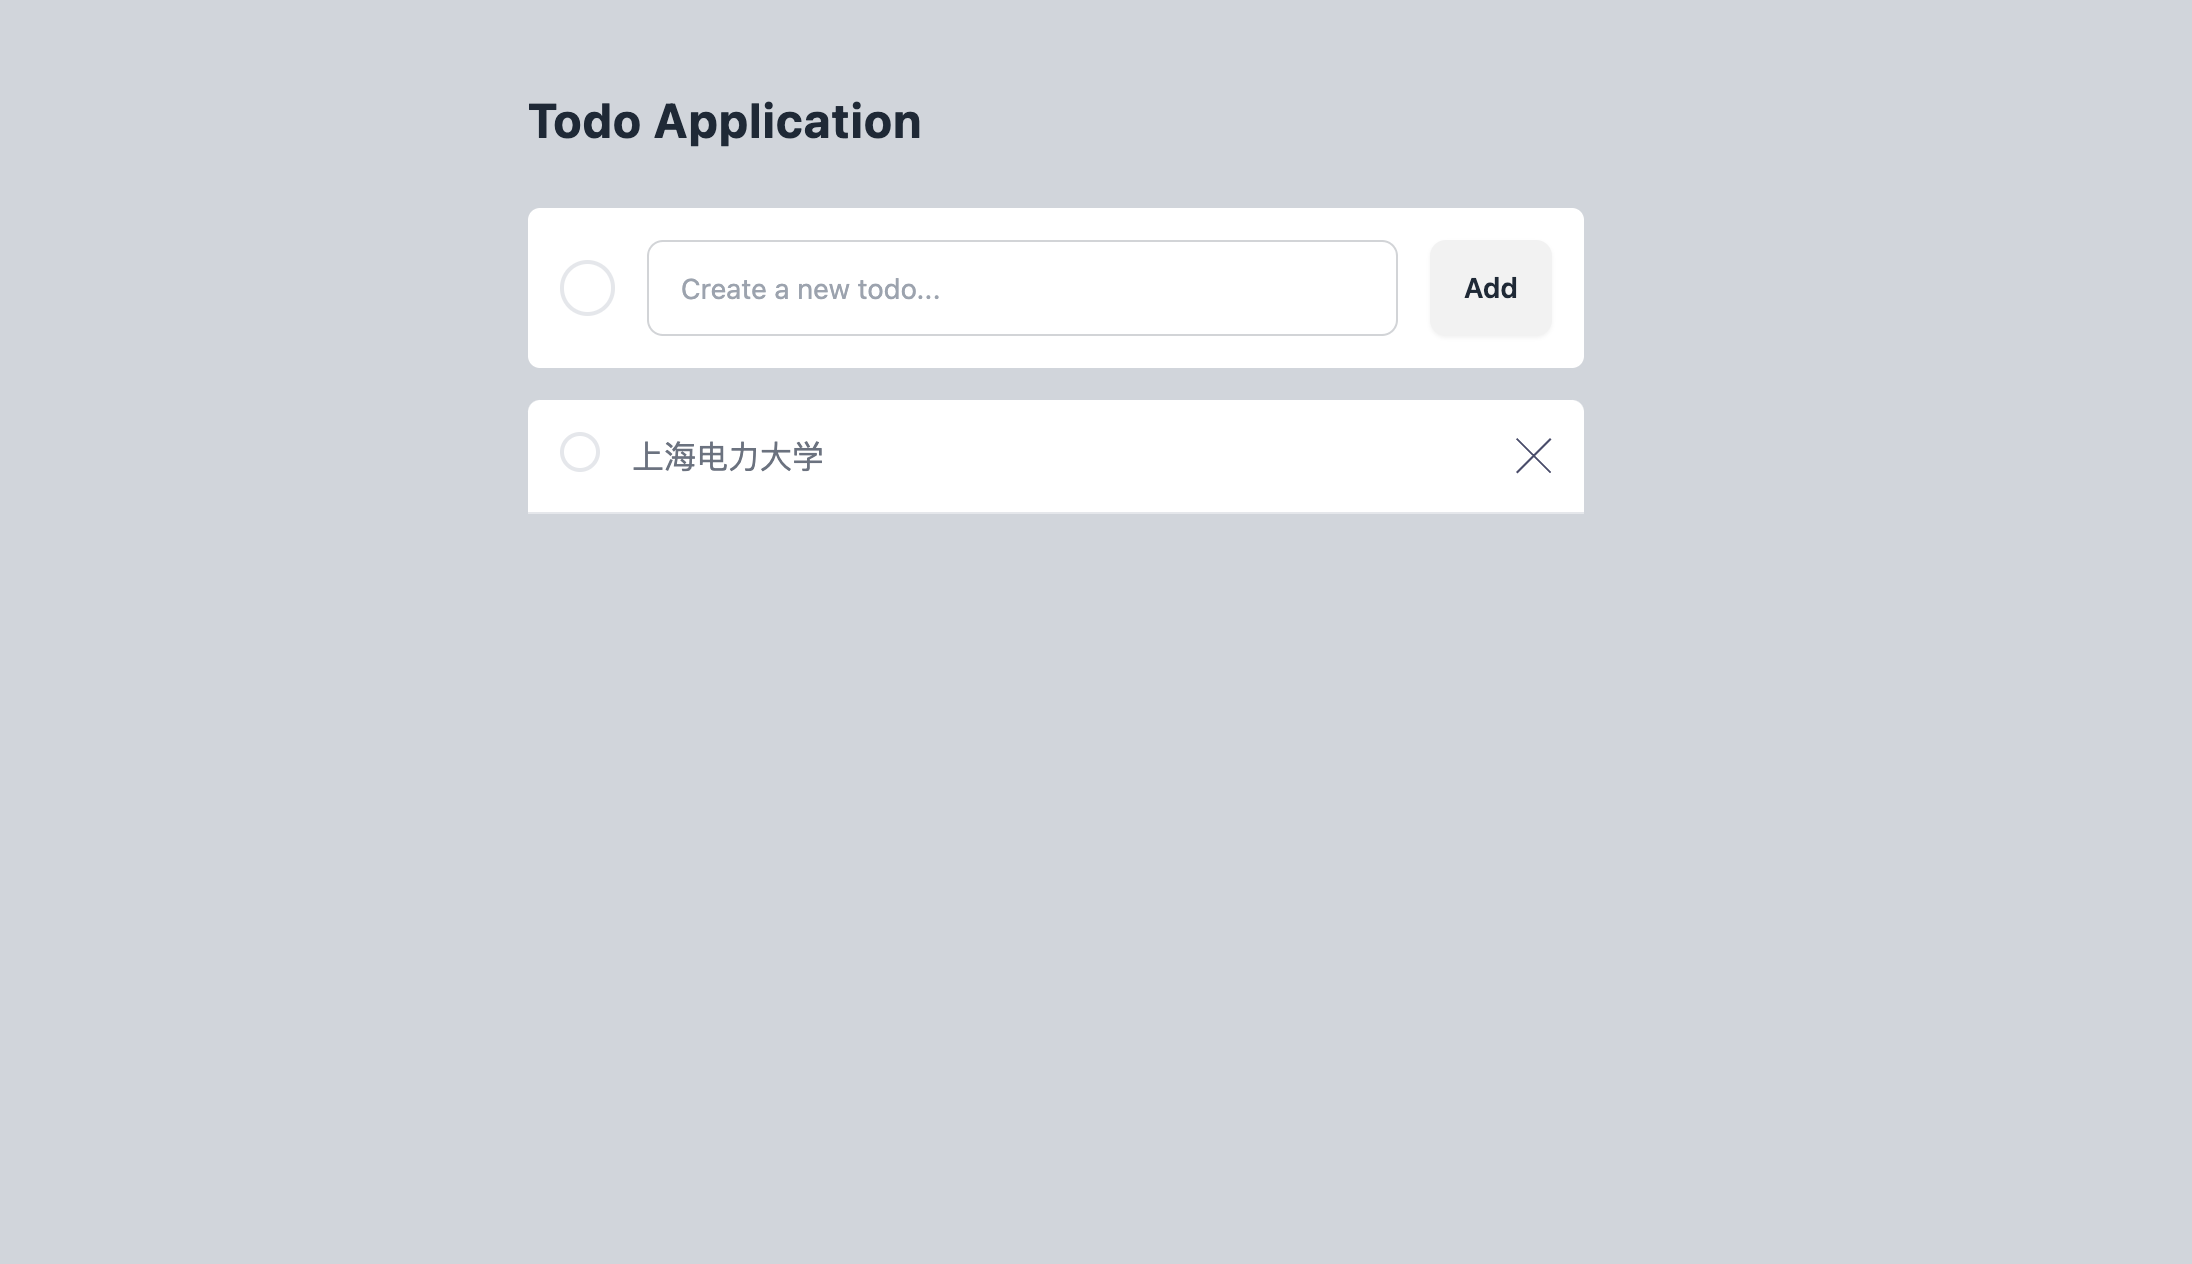
请用 VS Code 打开 src/components/TodoList.vue,输入如下代码:
<script setup>
import { ref } from "vue";
import XMark from "./icons/XMark.vue";

const todos = ref([]);

const initTodoDatas = ["上海电力大学", "数理学院", "现代Web开发", "Web前端"];

function uuid() {
  let uuid = "";
  for (let i = 0; i < 32; i++) {
    let random = (Math.random() * 16) | 0;

    if (i === 8 || i === 12 || i === 16 || i === 20) uuid += "-";

    uuid += (i === 12 ? 4 : i === 16 ? (random & 3) | 8 : random).toString(16);
  }
  return uuid;
}

initTodoDatas.forEach((todo) => {
  todos.value.push({
    id: uuid(),
    content: todo,
    is_done: false,
  });
});
</script>

<template>
  <div class="mt-4 rounded-t-md bg-white transition-all duration-75">
    <article class="flex gap-4 border-b border-gray-200 p-4">
      <button
        class="h-5 w-5 rounded-full border-2 transition-all duration-700"
      ></button>
      <p class="flex-auto text-gray-500 transition-all duration-700">
        {{ todos[0].content }}
      </p>
      <button>
        <XMark />
      </button>
    </article>
        <article class="flex gap-4 border-b border-gray-200 p-4">
      <button
        class="h-5 w-5 rounded-full border-2 transition-all duration-700"
      ></button>
      <p class="flex-auto text-gray-500 transition-all duration-700">
        {{ todos[1].content }}
      </p>
      <button>
        <XMark />
      </button>
    </article>
        <article class="flex gap-4 border-b border-gray-200 p-4">
      <button
        class="h-5 w-5 rounded-full border-2 transition-all duration-700"
      ></button>
      <p class="flex-auto text-gray-500 transition-all duration-700">
        {{ todos[2].content }}
      </p>
      <button>
        <XMark />
      </button>
    </article>
        <article class="flex gap-4 border-b border-gray-200 p-4">
      <button
        class="h-5 w-5 rounded-full border-2 transition-all duration-700"
      ></button>
      <p class="flex-auto text-gray-500 transition-all duration-700">
        {{ todos[3].content }}
      </p>
      <button>
        <XMark />
      </button>
    </article>
  </div>
</template>
-
const todos = ref([]): 这行代码创建了一个名为todos的响应式变量,并初始化为空数组。ref([])将普通的JavaScript数组转换为Vue响应式对象,这样当数组发生变化时,相关的Vue组件会自动更新。 -
function uuid() {...}: 这是一个用于生成UUID(通用唯一标识符)的函数,用于生成每一个Todo的唯一性ID。 -
initTodoDatas.forEach((todo) => {...}): 这是一个forEach循环,用于遍历初始待办事项数据数组。 在循环中,对于每个待办事项,都会调用uuid()函数生成一个唯一的ID,并将该待办事项对象推入todos.value数组中,该数组是一个响应式对象。
浏览器中的效果应该是这样的:
分离组件和共享数据
你可能注意到我们暂时没有使用之前定义的 todos 数组,而是使用了6个相同的 Todo 组件。
现在6个待办事项都是一样的内容,这有点单调,你可能会想,
如果可�以像调用函数那样可以通过传参对组件进行个性化定制就好了,你的想法是对的!
Vue 为组件提供了 props,使得在使用组件时,可以给组件传入属性进行个性化渲染。
请用 VS Code 新建 src/components/TodoItem.vue 文件,输入如下代码:
<script setup>
import XMark from "./icons/XMark.vue";
const props = defineProps(["todo"])
const { todo } = props
const { id, content , is_done} = todo
</script>
<template>
  <article class="flex gap-4 border-b border-gray-200 p-4">
    <button
      class="h-5 w-5 rounded-full border-2 transition-all duration-700"
    ></button>
    <p class="flex-auto text-gray-500 transition-all duration-700">
      {{ content }}
    </p>
    <button>
      <XMark />
    </button>
  </article>
</template>
TodoItem组件默认接收 props 参数,它是一个对象,
用于保存父组件传递下来的内容,
在这里我们使用 todo 变量对 props 进行了解构赋值,
并且也用了 id, content, is_done 变量对 todo 进行了解构赋值。
更改 src/components/TodoList.vue代码如下:
<script setup>
import { ref } from "vue";
import TodoItem from "./TodoItem.vue";

const todos = ref([]);
const initTodoDatas = ["上海电力大学", "数理学院", "现代Web开发", "Web前端"];

function uuid() {
  let uuid = "";
  for (let i = 0; i < 32; i++) {
    let random = (Math.random() * 16) | 0;

    if (i === 8 || i === 12 || i === 16 || i === 20) uuid += "-";

    uuid += (i === 12 ? 4 : i === 16 ? (random & 3) | 8 : random).toString(16);
  }
  return uuid;
}

initTodoDatas.forEach((todo) => {
  todos.value.push({
    id: uuid(),
    content: todo,
    is_done: false,
  });
});
</script>
<template>
  <div class="mt-4 rounded-t-md bg-white transition-all duration-75">
    <TodoItem :todo="todos[0]"/>
    <TodoItem :todo="todos[1]"/>
    <TodoItem :todo="todos[2]"/>
    <TodoItem :todo="todos[3]"/>
  </div>
</template>
<style></style>
我们给 TodoItem 组件传递了一个 todo 属性, 它的值为 todos 里面的属性,
所有传递的属性都会合并进 props 对象中,然后�传递给 TodoItem 组件,
这里 props 对象是这样的 props = { todo: { "id": "9afb8cb6-42b1-41fe-8d82-03e508b776a7", "content": "上海电力大学", "is_done": false} } 。
于是浏览器渲染效果又回到我们想要的。
在Vue的模板语法中,使用冒号 : 用于绑定动态数据,而不使用冒号则表示传递的是静态数据。
  <!-- 静态内容 -->
  <TodoItem todo="上海电力大学"/>

  <!-- 动态绑定,content属性的值为 todoList[0] 的内容 -->
  <TodoItem :todo="todos[0]" />
如果我们再传递一个属性该怎么做呢?其实很简单,代码如下:
<TodoItem content="上海电力大学" from="从App组件传递" />
最终 props 对象就会变成这样:props={ content: "上海电力大学", from = "从App组件传递" }
列表和 Key
目前我们有4个 Todo 组件,我们是一个一个取值然后渲染,这显得有点原始, 并且不可扩展,因为当我们的 todoList 数组很大的时候(比如 100 个元素), 一个一个获取就显得不切实际了,这个时候我们就需要循环介入了。
渲染组件列表
vue 允许我们循环渲染,于是我们可以将 src/components/TodoList.vue 的代码更改成如下:
<script setup>
import { ref } from "vue";
import TodoItem from "./TodoItem.vue";

const todos = ref([]);
const initTodoDatas = ["上海电力大学", "数理学院", "现代Web开发", "Web前端"];

function uuid() {
  let uuid = "";
  for (let i = 0; i < 32; i++) {
    let random = (Math.random() * 16) | 0;

    if (i === 8 || i === 12 || i === 16 || i === 20) uuid += "-";

    uuid += (i === 12 ? 4 : i === 16 ? (random & 3) | 8 : random).toString(16);
  }
  return uuid;
}

initTodoDatas.forEach((todo) => {
  todos.value.push({
    id: uuid(),
    content: todo,
    is_done: false,
  });
});
</script>
<template>
  <div
    class="mt-4 rounded-t-md bg-white transition-all duration-75"
  >
    <div v-for="todo in todos" :key="todo.id">
      <TodoItem :todo="todo"/>
    </div>
  </div>
</template>
<style></style>
v-for 是 Vue.js 提供的一个指令,用于迭代数组或对象的每一项,生成相应的元素。
在这个例子中,v-for="todo in todos" 表示遍历 todos 数组中的每一项,并为每一项都渲染一个 <div> 元素,
其中 :key="todo.id" 是为了给每一项指定一个唯一的标识符,以便 Vue.js 在更新时能够高效地追踪每个项的变化。
除了 <div>元素, li等都可以循环渲染。
在每次迭代中,todo 变量都代表数组中的当前项,
然后通过 :todo="todo" 将 todo 对象传递给 Todo 组件。
这样,Todo 组件就能够使用 todo 对象中的数据进行渲染和展示。
条件渲染
现在我们的TODOs还显示不出来其待办事项是否完成,所以通过为其渲染不同的内容来显示是否完成。
在 vue 中,我们可以根据不同的情况,渲染不同的内容,这也被成为条件渲染。
if-else 条件渲染
我们可以将 src/components/TodoList.vue 的代码更改成如下:
<script setup>
import { ref } from "vue";
import TodoItem from "./TodoItem.vue";

const todos = ref([]);
const initTodoDatas = ["上海电力大学", "数理学院", "现代Web开发", "Web前端"];

function uuid() {
  let uuid = "";
  for (let i = 0; i < 32; i++) {
    let random = (Math.random() * 16) | 0;

    if (i === 8 || i === 12 || i === 16 || i === 20) uuid += "-";

    uuid += (i === 12 ? 4 : i === 16 ? (random & 3) | 8 : random).toString(16);
  }
  return uuid;
}

let isDoneValue = true; // 初始化 is_done 的值为 false
initTodoDatas.forEach((todo) => {
  todos.value.push({
    id: uuid(),
    content: todo,
    is_done: isDoneValue, // 使用当前的 is_done 值
  });
  isDoneValue = !isDoneValue; // 切换 is_done 的值
});
</script>
<template>
  <div class="mt-4 rounded-t-md bg-white transition-all duration-75">
    <div v-for="todo in todos" :key="todo.id">
      <TodoItem :todo="todo" />
    </div>
  </div>
</template>
<style></style>
其中增加isDoneValue的目的是为了手动让is_done的值交替变化,用以验证渲染效果。
将 src/components/TodoItem.vue 的代码更改如下:
<script setup>
import { toRefs } from "vue";
import XMark from "./icons/XMark.vue";
const props = defineProps({
  todo: { id: Number, content: String, is_done: Boolean },
});
const { id, content , is_done} = toRefs(props.todo)
</script>
<template>
  <article class="flex gap-4 border-b border-gray-200 p-4">
    <button
      class="h-5 w-5 rounded-full border-2 transition-all duration-700"
    ></button>

    <p v-if="is_done" class="flex-auto text-gray-300 line-through transition-all duration-700">
      {{ content }}
    </p>
    <p v-else class="flex-auto text-gray-500 transition-all duration-700">
      {{ content }}
    </p>

    <button>
      <XMark />
    </button>
  </article>
</template>
defineProps 是 Vue 3 Composition API 中提供的一个函数,用于声明和定义组件的 props。
在代码中,defineProps 用于声明和设置 todo 这个 prop 的类型。
const props = defineProps({
  todo: { id: Number, content: String, isDone: Boolean },
});
-
defineProps:这是一个用于声明组件 props 的函数,它接受一个对象作为参数,对象中包含了每个 prop 的�名称和对应的类型。 -
todo: { id: Number, content: String, is_done: Boolean }:这表示组件有一个名为todo的 prop,其类型是一个对象, 这个对象包含三个属性:id、content、is_done,分别指定了它们的类型。
通过这样的声明,Vue 会在组件中验证传递给 todo prop 的值是否符合声明的类型。
在这个例子中,Vue 期望传递的 todo 是一个对象,且这个对象有 id、content 和 is_done 这三个属性,
分别对应着 Number、String 和 Boolean 类型。
这样的声明有助于提高组件的可维护性和可读性,
同时也可以帮助 Vue 在开发过程中进行更好的类型检查。
如果传递的 prop 类型不符合声明,Vue 会在开发环境下发出警告,有助于及早发现并修复问题。
效果如下:
toRefstoRefs 函数用于将一个带有响应式属性的对象转��换成一个普通对象,其中的每个属性都是一个引用。通过使用 toRefs(props.todo),确保 id、content 和 is_done 的每个属性都保持响应式。
在组合式 API 中,props 不会自动变成响应式。因此,通过使用 toRefs,使得 props.todo 的每个属性都具备了响应式。这在你想以一种从响应式中受益的方式使用这些属性时很有用,比如在计算属性或模板中。
如果直接使用 props.todo 而不使用 toRefs,这些属性就不会是响应式的,对它们的更改可能不会触发响应系统更新你的组件。
三元表达式
当使用三元表达式时,你可以将类对象的写法转换为如下:
<script setup>
import { toRef } from "vue";
import XMark from "./icons/XMark.vue";
const props = defineProps({
  todo: { id: Number, content: String, is_done: Boolean },
});
const { id, content , is_done} = toRef(props.todo)
</script>
<template>
  <article class="flex gap-4 border-b border-gray-200 p-4">
    <button
      class="h-5 w-5 rounded-full border-2 transition-all duration-700"
    ></button>
    <p :class=" is_done?
    'flex-auto text-gray-300 line-through transition-all duration-700 ' :
    'flex-auto text-gray-500 transition-all duration-700'
    " >
      {{ content }}
    </p>
    <button>
      <XMark />
    </button>
  </article>
</template>
这使用了三元运算符,如果 is_done 为 true,那么应用 'text-red-600 line-through' 类,否则应用 'text-blue-600' 类。这样可以更加简洁地表达条件样式的逻辑。
状态更新
为按钮增加逻辑
请用 VS Code 打开 src/components/TodoItem.vue,输入如��下代码:
<script setup>
import { toRefs } from "vue";
import XMark from "./icons/XMark.vue";
const props = defineProps({
  todo: { id: Number, content: String, is_done: Boolean },
});
const { id, content, is_done } = toRefs(props.todo);
</script>
<template>
  <article class="flex gap-4 border-b border-gray-200 p-4">
    <button
      class="h-5 w-5 rounded-full border-2 transition-all duration-700"
      @click="is_done = !is_done"
    ></button>

    <p
      v-if="is_done"
      class="flex-auto text-gray-300 line-through transition-all duration-700"
    >
      {{ content }}
    </p>
    <p v-else class="flex-auto text-gray-500 transition-all duration-700">
      {{ content }}
    </p>

    <button>
      <XMark />
    </button>
  </article>
</template>
这段代码主要增加了@click="is_done =!is_done"的逻辑,当点击按钮时,会触发is_done的更新,从而触发组件的重新渲染。
@click 是 Vue.js 中的一个指令,用于绑定一个事件监听器到元素上。 在这个例子中,@click 指令用于绑定一个事件监听器到按钮元素上,当按钮被点击时,会触发指定的事件处理函数。
事件处理函数是 is_done =!is_done,它会将 is_done 的值取反,从而完成渲染,实现“完成todo”的功能。
为删除按钮增加逻辑
<script setup>
import { toRefs } from "vue";
import XMark from "./icons/XMark.vue";
const props = defineProps({
  todo: { id: Number, content: String, is_done: Boolean },
});
const { id, content, is_done } = toRefs(props.todo);
</script>
<template>
  <article class="flex gap-4 border-b border-gray-200 p-4">
    <button
      class="h-5 w-5 rounded-full border-2 transition-all duration-700"
      @click="is_done = !is_done"
    ></button>

    <p
      v-if="is_done"
      class="flex-auto text-gray-300 line-through transition-all duration-700"
    >
      {{ content }}
    </p>
    <p v-else class="flex-auto text-gray-500 transition-all duration-700">
      {{ content }}
    </p>

    <button @click="$emit('delete', id)">
      <XMark />
    </button>
  </article>
</template>
<script setup>
import { ref } from "vue";
import TodoItem from "./TodoItem.vue";

const todos = ref([]);
const initTodoDatas = ["上海电力大学", "数理学院", "现代Web开发", "Web前端"];

function uuid() {
  let uuid = "";
  for (let i = 0; i < 32; i++) {
    let random = (Math.random() * 16) | 0;

    if (i === 8 || i === 12 || i === 16 || i === 20) uuid += "-";

    uuid += (i === 12 ? 4 : i === 16 ? (random & 3) | 8 : random).toString(16);
  }
  return uuid;
}

let isDoneValue = true; // 初始化 is_done 的值为 false
initTodoDatas.forEach((todo) => {
  todos.value.push({
    id: uuid(),
    content: todo,
    is_done: isDoneValue, // 使用当前的 is_done 值
  });
  isDoneValue = !isDoneValue; // 切换 is_done 的值
});

const deleteTodo = (id) => {
  todos.value = todos.value.filter((todo) => todo.id !== id);
};
</script>

<template>
  <div class="mt-4 rounded-t-md bg-white transition-all duration-75">
    <div v-for="todo in todos" :key="todo.id">
      <TodoItem :todo="todo" @delete="deleteTodo" />
    </div>
  </div>
</template>
<style></style>
在 TodoItem 组件中,我们通过 @click="$emit('delete', id)" 来触发一个名为 delete 的事件,并将当前 todo 的 id 作为参数传递给父组件。
emit 是 Vue.js 中用于触发自定义事件的方法,它接受两个参数:事件名称和传递给事件处理函数的数据。在组件里,子组件可以通过 $emit 方法向父组件发送消息。
在 TodoList 组件中,我们定义了一个名为 deleteTodo 的函数,用于处理删除操作。
在 deleteTodo 函数中,我们使用 todos.value = todos.value.filter((todo) => todo.id !== id) 来过滤掉 id 与传入的 id 不匹配的 todo,从而实现删除操作。
这样,当子组件触发 delete 事件时,父组件的 deleteTodo 函数就会被调用,并将 id 作为参数传递给它。
在 Vue.js 里,直接写 delete="deleteTodo" 和加上 @ 写成 @delete="deleteTodo" 有着本质区别。
delete="deleteTodo"的含义 当你在组件标签上写delete="deleteTodo"时,这其实是在给组件传递一个静态属性。在 Vue 的模板里,没有使用v-bind(简写为:)或者v-on(简写为@)的属性,都会被当作静态属性处理。这意味着delete这个属性的值就是字符串"deleteTodo",而非一个方法引用。
子组件接收到的 delete 属性值是字符串 "deleteTodo",而不是父组件里定义的 deleteTodo 方法。
@delete="deleteTodo"的含义@是v-on指令的简写,用于监听事件。@delete="deleteTodo"表示父组件在监听子组件触发的名为delete的自定义事件。当子组件通过$emit方法触发delete事件时,父组件会调用deleteTodo方法。